
This post contains affiliate links to products I talk about within this blog post. If you make a purchase I may make a small commission.
This momma was totally surprised by a Circut Explore Air 2 for Christmas this year. My husband and I had agreed not to get each other gifts since we are saving up to buy a house. That didn’t stop him from using a Christmas bonus he received (and didn’t tell me about) to buy the machine for me. I’m definitely a lucky girl.
As soon as I started to open the box I knew I wanted to share this. I know there are many of you who are afraid to pull your machines out of the box or get easily intimidated by where to start. Going from the original Silhouette Cameo to this machine will and has been a learning curve. I admit I felt frustrated a few times during the process and even felt like they needed more instruction when it came to setting up the machine. After I had it all plugged in I was like – now what!? Then I did my first design and it said my machine wasn’t connected. It was plugged in with the USB cord!? I hope this helps walk you through unboxing and setting up your Cricut Explore Air 2 so you don’t have the same issues.
If you find this post helpful please share on Pinterest so we can reach other crafters in the same boat.


In the Silhouette and Cricut Support Group on facebook there were a lot of people who were gifted new machines too. Maybe that is how you ended up here? Either way I’m happy to have you and the chance to show you how to setup your new machine. Don’t forget to check out the Cheapest Place to buy Silhouette and Cricut Supplies when your ready to stock up.
In the Circuit Explore Air 2 Box –
Here is what was in the box. I took the machine out so you can see what was underneath.
Below the machine was the power cords, USB cord to hook from the machine to your computer, 12×12 cutting mat, sketch pen, warranty booklet and another book with ideas and a quick overview. The idea and overview book should include instructions in my opinion. Or maybe they should include another booklet with picture step-by-step instructions. I am personally a visual learner.


The Cricut Explore Air 2 Features –
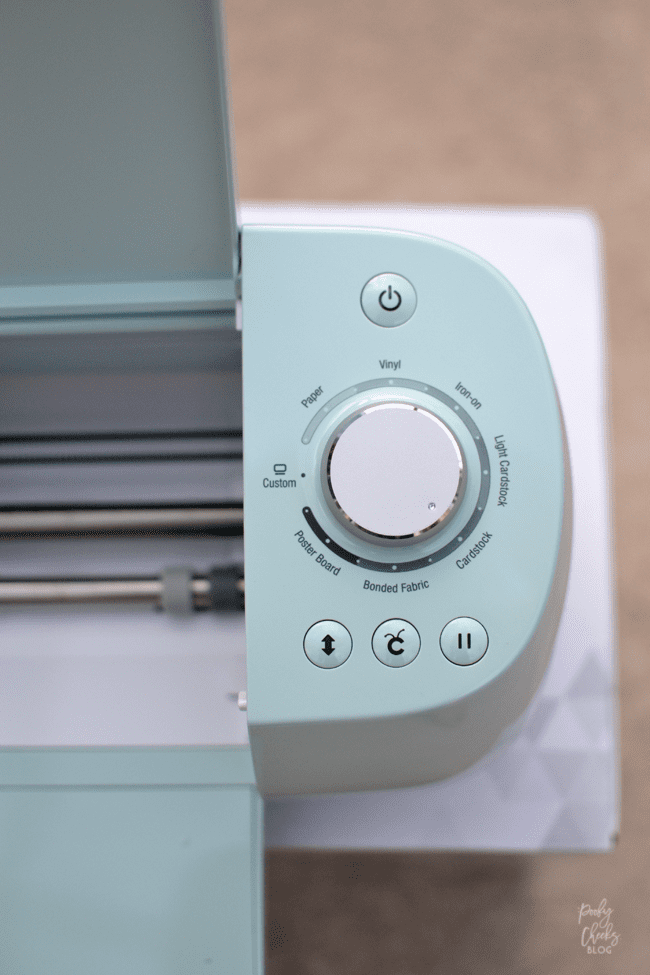
Here is the right side of the Cricut Explore Air 2 machine. The power button on top, material dial in the middle, from left to right along the bottom are the load/unload, cut and pause buttons. I love that it does look sleek and the mint color is my favorite.

On the left side of the machine you have a little spot for tools. Maybe it will help me to stop misplacing my weeding hook. A girl can hope! Then under that is a port for cartridges. At the bottom is the open button. I like that the machine easily closes up between use to take up less space and keep the dust out.


Here is a look into the cartridge opening. The old machines by Cricut didn’t hook to the computer and they only had cartridges. This is a way for you to still get use out the cartridges you may have spent a small fortune on. I do know the newest machine, the Cricut Maker, does NOT have a spot for cartridges anymore.


This is the blade housing and when you unbox the machine the blade is already ready to go in slot B. The part I loved the most when I cut my first design was that there is a light in the blade housing. This is a great feature since I often work in the evening in low light. I also have to mention how quiet the machine is. A few times I looked over wondering why the machine wasn’t cutting only to find it cutting away.


I learned A is for accessories like the marker that came in the box and B is for blade. Easy enough.

Then there are two small storage spots which I think are perfect for storing small scraps, accessories and blades.


Hooking up the Cricut Explore Air 2 –
This machine is Bluetooth hence the ‘Air’ part but I was so used to plugging my old Silhouette into the computer that I used the USB cord. I can’t wait to try to Bluetooth cutting later in the week.
On the back of the machine you will see the two spots to plug your cords into. The right is for the power cord and the left is for the USB cord if you choose to hook it directly into your computer.

This is the USB cord. The USB goes into the USB port on your computer and the bigger side of the cord goes into the back of the machine.


Then there is the power cord. I think this one is self explanatory.

Setup the Cricut Explore Air 2 on the Computer-
At this point the machine is ready to go. By pulling it out of the box and plugging in two cords it can be powered on.
Start out by going to the Cricut website and scroll all the way to the bottom until you see the bottom menu. Click on ‘Sign In’ to sign in with your Cricut ID or to create one. You have to have a Cricut account setup to access the Cricut design space.

Click on Create Cricut ID.

Fill out all of the information fields and press submit.

Now for the next part. Link the machine to the software. I designed something, went to cut it and got an error message that I did not have a machine linked to my account. It took me a few minute to figure it out.
Click on the list icon (the three lines in the top left corner) and a drop down menu comes down.

From the list click on New Machine Setup.

Then you are taken to the next screen where you click on Get Started.

The following screen has you hook your machine up with the USB cord and turn the power on to your machine. Once I did this it immediately recognized my machine.

After it recognized the Cricut Explore Air 2 machine it prompted me to download the software. It took about five minutes to install the software.


This completed the setup process on the computer. Learning the software is going to be a bit of learning curve I can tell so I plan to share more about using that soon! Don’t forget to sign up to our newsletter to get updates when we share new cut files and tutorials. Get instant access to all of the cut files upon confirming your newsletter subscription!
Cricut Design Space
Thursday 5th of May 2022
To start projects on the Cricut Setup go with your Cricut machine, start with Cricut Design Space. Design Space is a universal app/ software for all the Cricut machine versions. You can easily create your desired projects for personal or professional purposes through this platform. With the best Cricut machines, you get to experience endless possibilities of what you can create for your use. When it comes to home crafters who are constantly troubled to work with smaller spaces for their projects now, they have a chance to create projects on the go. Whatever you want, you can create with compact Cricut machines. Now you have got more space for your projects without worrying about where you will restore the machine. Now that you are familiar with the benefits of Cricut machines, learn how to use Cricut Design Space for your machines like Cricut Maker 3, Explore Air 2, or others.
tammy
Friday 20th of September 2019
hi there I can not find my disk to my cricut explore air 2 what can I do?
Using Text In Cricut Design Space - Welding and Resizing Text - Poofy Cheeks
Sunday 28th of January 2018
[…] I am starting from the beginning so if you are familiar with design space skip down a few pictures. If you still haven’t pulled your machine from the box I can help you unbox and setup your Cricut account. […]
Michelle
Wednesday 27th of December 2017
I too am just switching from the silhouette to the Cricut. The machine is so exciting! But I agree, there’s definitely a learning curve with the software and I’m really looking forward to following along with you! My biggest complaint so far is the Cricut image store, it’s so weird that you can’t click on the image to make it bigger and get more info on it. And as a graphic designer I was really comfortable with the silhouette software because it’s so similar to Adobe products, but I could see how that would be confusing for the non designers. But I don’t find the Cricut design space to be intuitive at all. I don’t know where to start, so can’t wait to follow you! Thanks so much for the great info!
Kelsey
Monday 1st of January 2018
I could not agree more! I use Illustrator to do most of my designs and having the keyboard shortcuts similar in Silhouette was very helpful.