
Since our very first rental house when I did the Goodwill dresser redo, furniture makeovers have been the way I added furniture to our homes. I’m back at it again with a DIY old dresser redo. My friend alerted me to a roadside dresser and we picked her up and brought her to my garage.
My husband said no to another piece of furniture taking up space in the garage. I didn’t listen.
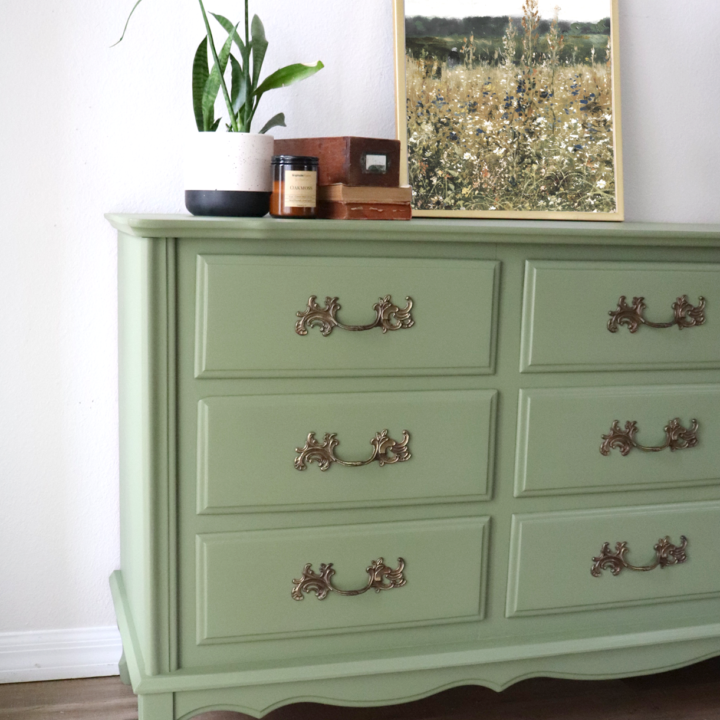
This solid wood dresser had to come home with me and in the end, I took the free dresser and sold it for over $200 on Facebook marketplace. Come along and I’ll explain how I transformed it.

Before You Start a Furniture Makeover
Before you start your furniture redo you need to determine if you are going to use primer, what color to paint, and pick out a polyurethane.
Should I Prime My Dresser Before Painting?
Priming is an essential step when you’re redoing furniture. It helps to prepare the surface for the paint, ensuring that it adheres properly and creates a smooth, even finish. You should use a primer if you’re working with a piece that has a shiny or glossy surface, if you’re painting over a dark or bold color, or if you’re using a type of paint that is not compatible with the existing finish. A primer can also help to seal in any stains or odors that may be present on the furniture.
With that being said if you have sanded down to the bare wood, you do not need to use primer. There are many times when I sand a piece down hoping I can stain and show off the beautiful wood only to find an imperfection that is best covered with paint.
The DIY Old Dresser Redo In Pictures…
Pictures are worth a thousand words, am I right? So here are a bunch of photos and a short description of how I went about this old dresser redo.


I tried the stove cleaner method to get the stain off the drawers. It worked, but it didn’t work as well as I was hoping. Maybe the Florida sun and heat had something to do with it. The pic below shows how they looked after I used the stove cleaner and then cleaned them.


When I first started the dresser I was going to paint it with black paint I already had, but then I didn’t like it and changed my mind. P.S. Don’t forget to fix your drawers if needed. I’ll write about this more in another post.


What do I need to redo a dresser?
Here is list of the supplies you will need for a dresser redo. These supplies are specifically for taking a wood dresser and transforming it with paint. If you are making over a non-wood dresser these steps will not work because in most cases the paint will scratch right off.
- Orbital Sander
- Sandpaper in varying grit – 120-220 (for your orbital sander)
- Kilz Primer
- Latex Paint – I am a loyal BEHR paint girl
- Paintbrush
- Polyurethane
- Cleaning cloth


*Tips for the Best Dresser Redo Results
- Start by cleaning your piece of furniture with a microfiber cloth. I typically pull the drawers out and vacuum or hit it with the leaf blower. Then I break out a mop bucket, fill it with hot water and sometimes a splash of vinegar to wipe everything down.
- Scuff sanding is the most important part. Scuff sanding is not sanding all of the old paint or stain from the furniture. It is merely roughing up the surface so the primer and paint have something to adhere to.
- Sand from a high grit to low grit while wearing a respirator mask. I start out with 120 grit sandpaper, move to 180, and then 220 or so. If I’m working with a heavily painted or stained piece I may even start with an 80 grit but be careful not to leave those sanding swirls. Pro tip: Amazon sells a multi-grit pack for the best price.
- To Prime or Not to Prime? I like to use Kilz primer after sanding but I don’t always do it. My decision is based on how much I sanded and if I think the color or previous stain will bleed through.
- Picking paint is my favorite part and can make or break a makeover. For one dresser I can usually get away with using one BEHR sample size. This works out perfectly since I like to switch colors up on every piece and they are under $5.
- The paintbrush I recommend is the Wooster shortcut. I own half a dozen and buy them over and over. They are small, easy to work with, and comfortable in my hand.
- Polyurethane is extremely important because it protects your piece of furniture. I prefer matte paints, but I also want them to be easily wiped down since I have four kids. This is where polyurethane becomes your bestie. One coat or two if you are like me and miss spots the first go. My fave is the BEHR matte polyurethane because it has hardly any odor and dries quickly.
- Avoid Brush Strokes by using a splash of Floetrol in your paint and using a good quality brush without large, stiff bristles. Between coats of paint lightly sand with 220 (or higher) grit sandpaper followed by wiping down the piece with a damp lint-free cloth. If you are working in hot or humid conditions where the paint is drying quickly, mix 2 parts paint with 1 part water for the final coat of paint.

Roadside Rescue Dresser Redo
Complete how-to for painting a wooden dresser.
Materials
- Wooden Dresser or Furniture Piece
- Orbital Sander
- Sanding Discs (120-220 grit)
- Latex Paint
- Paint Brush
- BEHR Polyurethane
- Respirator Mask
- Lint Free Cloth
Instructions
- Start by removing the drawers and cleaning your piece of furniture. *See notes*
- Once clean, remove all of the hardware.
- Scuff sand the entire dresser using 120 grit sandpaper, then 180, then 220. *See tips on what a scuff sand is*
- Wipe the entire piece down with a lint-free cloth to get rid of any leftover sanding dust that will cause imperfections during painting.
- Optional: Paint with 1-2 coats of Kilz primer, let dry in between coats.
- With your latex paint, give the entire piece a full coat of paint. *See tips on how to avoid brush strokes*
- When the first coat of paint is dry, (dry time varies depending on the paint brand), give the dresser another coat of paint. You may have to repeat this step depending on your paint color and coverage.
- Allow the final coat of paint to dry completely before using a clean brush to apply a coat of polyurethane.
- Allow this to dry completely, put the hardware back on and the drawers back in.
MonaLisa
Monday 8th of January 2024
Beautiful! Thanks for the info! Where do I find *tips on how to avoid brush strokes*? Thanks again!
Kelsey
Tuesday 9th of January 2024
Gah, I did miss that. Thanks for the heads up. Here it is.. Avoid Brush Strokes by using a splash of Floetrol in your paint and using a good quality brush without large, stiff bristles. Between coats of paint lightly sand with 220 (or higher) grit sandpaper followed by wiping down the piece with a damp lint-free cloth. If you are working in hot or humid conditions where the paint is drying quickly, mix 2 parts paint with 1 part water for the final coat of paint.