
This DIY Boutique Hair Bow post contains affiliate links to products I use and recommend.
Up until I had Delilah I didn’t realize how fast all of the fancy girl accessories add up. Boys don’t wear hair accessories, jewelry, tutus or glittery shoes. With boys it is pretty cut and dry when it comes to dressing them. With girls it is a whole other story that involves matching the accessories and shoes to the outfit and of course there has to be an outfit for every special occasion. I asked my sister-in-law (I told you she was crafty!!) to come over and share a hair bow tutorial. Since she knows how much Delilah loves Frozen she brought over some Frozen print ribbon to use for the tutorial.
When I started dating Mike and met his family for the first time my (now) sister-in-law, April, had a one year old daughter named Reagan. Of course now that Mike and I are married Reagan is my niece but from the very first time I met Reagan she always had some sort of cute bow or headband in her hair. April has always made most of Reagan’s hair accessories and does a great job. She knows how to make so many different types of bows so whenever we need something specific I am lucky to be able to ask her.
If you are looking for a specific ribbon or print ETSY is where I find lots of my unique ribbons.


Supplies Needed:
- 1″ Grosgrain Ribbon
- Ribbon – 1.5 inch wide
- 1/2″ Grosgrain Ribbon
- Fishing line or thread – about a 4-6 inch long piece
- Scissors
- Lighter
- Alligator Clip
- Hot Glue Gun
- Ruler or measuring tape
DIY Boutique Hair Bow Tutorial
Step 1:
Layer your 2 inch wide and 1.5 inch wide ribbons over one another. Measure and cut them 24 inches long.

Step 2:
Using on hand to wrap the ribbons and one hand to hold everything secure in the middle of the bow follow the pictures and diagram below. Start with one end of the ribbon in the middle and wrap it up and then around to the other side and over. The pink from the diagram is the right side of the ribbons and the purple is the underneath.
Once you have half of the ribbon like the bow diagram on the left keep going and cross over to fold the other half of the ribbon.


Step 3:
Once you have finished folding your ribbon to create the bow use your hands to scrunch the two sides and secure with your fingers.

Step 4:
Take your already cut piece of fishing line or thread and wrap it around the middle of the bow and knot. Repeat and finish with a double knot to make sure it is secure.

Step 5:
Cut a 6 inch piece of the 1.5 inch ribbon and knot it so that the right sides are facing up on both sides.

Step 6:
Cut a 3-4 inch piece of your 1/2 inch ribbon and use it along with a glue gun to line the alligator clip. Squeeze open the clip and apply hot glue to the top portion of the clip then place the ribbon on it and let the clip clamp shut. Quickly fold the ribbon over the top so that the hot glue holds the ribbon in place. Fold the ribbon over the back of the clip and secure with another dot of glue underneath.


Step 7:
Apply a dot of hot glue to the underneath of the bow and hold the alligator clip in place until the glue has set.


Step 8:
Turn the bow over so the right side is facing up and apply a large dot of hot glue right in the center. Take the piece of 1.5 inch wide ribbon you knotted in step 6 and put the knot right over the glue holding until secure. The two tails of the ribbon should be centered so you can wrap them and secure them with the alligator clip.


Step 9:
Use one hand to hold open the alligator clip and then use the other to apply a dot of hot glue. Fold one end of the ribbon around the bow and between the alligator clip. Trim the ribbon and then repeat with the other side.


The picture below shows how the bow should look after you have wrapped, glued and trimmed the center knot ribbon.

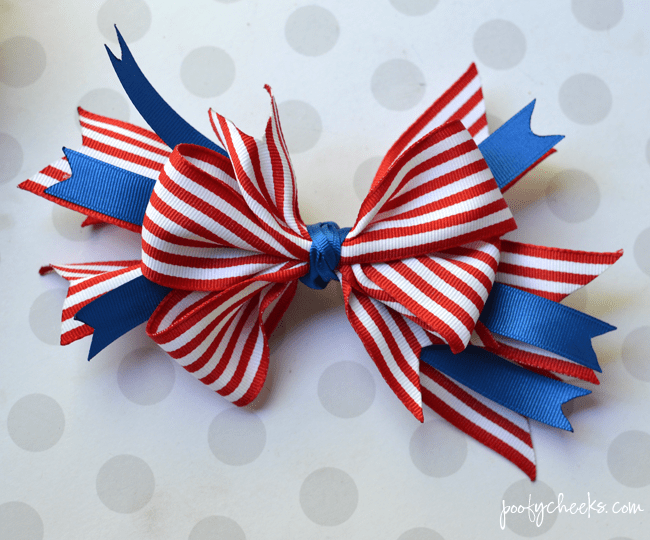
This picture shows how the top should look when you are finished. Doesn’t it look perfect!? Now you can use this step-by-step tutorial to DIY boutique hair bows for a lot less than you can buy them! Plus you can change the ribbons to make bows for every outfit and occasion.

Delilah will be wearing her bow during our next Disney trip. I’m sure she will want to wear it every other day too since she is a bit Frozen obsessed! Thanks for stopping by. A big thank you to my sister-in-law for showing all of us how to make these bows!!
If you liked this tutorial check out the Spiker Bow Tutorial


Combine the two for a Layered Boutique Hair Bow


15 Easy Ways to Make a Bow with Ribbon - DIY Ribbon Bow
Tuesday 29th of March 2022
[…] One of the most adored hair accessories by the girls includes the pretty ribbon bows especially inspired from the frozen. Now you can cheaply make some at home using some cutely colorful ribbon and let your kids have some fancy hairdos. Learn the boutique style hair bow making here poofycheeks […]
Faux Leather Hair Bow Tutorial - Bow Cut File and PDF Template - F
Saturday 22nd of June 2019
[…] Double Bow Hair Bow Tutorial […]
20+ DIY Hair Bows Tutorials | How to Make a Hair Bow
Saturday 8th of June 2019
[…] DIY Disney Hair Bows […]
Susan Armstrong
Sunday 3rd of February 2019
Here's a suggestion (in the name of safety): Place a votive candle on a saucer or flat candle holder. Light that to use to seal the edges of your ribbon. This will leave both hands free to manipulate the ribbon. Also, keep a small bowl of water handy just in case you catch the ribbon on fire & need to extinguish the flame quickly. I have tried both the candle & the lighter methods in the past & find the candle method not only safer but also easier.
Bubblegum Necklace Tutorial - Chunky Necklace for Girls - Poofy Cheeks
Thursday 13th of September 2018
[…] color combos for every outfit and holiday in no time. I would often make matching leg warmers, and boutique style hair bows. Oh how I miss dressing her in the days before she wanted to have opinions on what she […]