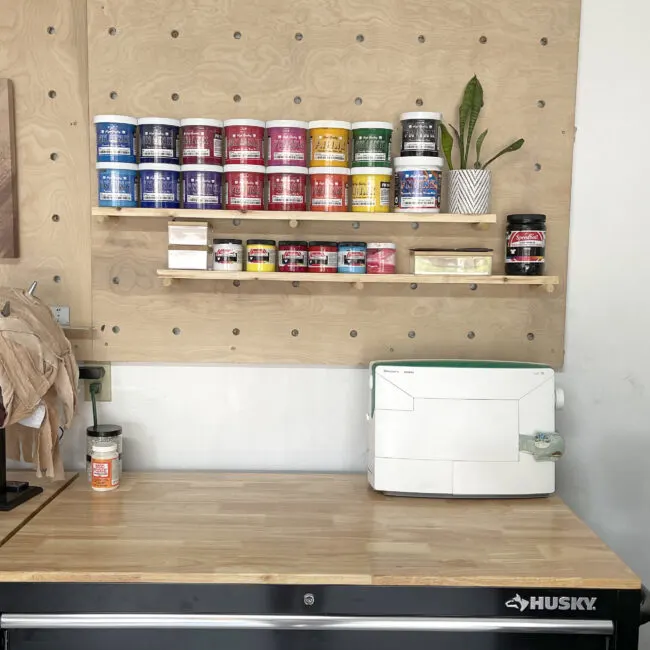
As the busy holiday season came to an end in my ETSY shop, I started working on a DIY Craft Pegboard to organize supplies in my garage. My husband was a huge help. He brought this idea to life as I was screenprinting all the live long day!
Get the instructions on how to make your own DIY Craft Pegboard and some other great organization crafts from my #TeamCreativeCrafts friends.
During the busiest part of the year I had orders taking over my kitchen, formal dining room and breakfast nook. Mike and I both knew we needed to take advantage of the garage space. We had our eye on the Husky toolbenches because of the nice tops that would allow us a surface to craft and create. Then we figured why not put begboards above them for added storage?
Mike was not sold on typical begboards so when I showed him some pictures of more ‘manly’ looking pegboards he was sold. We purchased a 4×8 foot peice of 1/2 inch birch plyboard and had the nice man at Home Depot cut it into two 4×4 foot pieces to fit into our car. One 4×4 piece was going to be Mike’s and the other mine.
We also purchased a few dowel rods to cut into 6 inch pieces for our pegs and a paddle bit for our drill to make the holes in the plyboard.
Pegboard Supplies
- 4’x8′ plyboard (1/2″ thick and cut in half by nice man at Home Depot)
- (3) 1″x2″x8′ wood strips to mount the pegboard to the wall
- 3/4 inch wide dowel rods (cut into 6″ long pieces using a miter saw)
- 3/4 inch flat boring bit to make holes in the plyboard
- Screws
- Drill
- Stud finder
- Ruler and Square
- Pencil
Before the Pegboard…

The two Husky workbenches were a great investment. They are tough and sturdy. Did I mention they also hold TONS of craft supplies in those drawers? Once we got them in the garage we wanted EVEN MORE storage and something that looked good too. Queue the pegboards.
DIY Craft Pegboard Instructions

- Start out by planning your holes and spacing on a peice of paper. We wanted our holes to be 6″ apart, so I drew up a diagram to show the spacing around the edges before measuring and marking where to drill on the actual wood.
- I used a pencil, square and ruler to mark the center of the holes onto the wood.
- We placed the wood on an old pallet and then Mike got to work drilling all of the holes with the drill and 3/4 boring bit. He lined the paddle bit up onto the spots I marked so they were centered.
- Once all the holes were done, we used our stud finder to mark and screw the 1×2 furring strips to the wall above our work benches. We hung three of the 1x2x8 boards horizontally on the wall making sure they were drilled into the studs. They were hung so that the pegboards would be drilled into them at the top, middle and bottom.


- Once the 1x2s were hung, we used screws to drill the pegboards into them.
- The last step was to cut our 3/4 doll rod into 6″ pieces. We used a rubber mallet to help get them into the pegboard and started hanging our supplies.

Two Person Job
One person could probably cut all the wood, but hanging them was a two person job. The wood was too heavy for one person to hold and drill into the wall. This project came together in an afternoon and I still love seeing it every time I open the garage.
Mike and I both put our marks on our sides so his has a Mandolorian picture and I created shelves using pegs and scrap 1x4s for all my screenprint paints.

More Organizational Crafts:

- Easy Fabric Storage Ideas with Dollar Tree Supplies by Laura of Me and My INKlings
- Shimmering Hair Tie Storage Hanger created by Lindsay of Artsy-Fartsy Mama
- Create colorful DIY Felt Trays with a tutorial from Smitha at Smiling Colors
- Upcycled Chapstick Organization is easy and super cute by Shani of Sunshine and Munchkins
- A brilliant storage solution with a DIY Blanket Ladder from Justine of Little Dove
- Stylish Crocheted Storage Baskets with Free Patterns by Erica of 5 Little Monsters
- DIY Pegboard Garage Storage for a Shared Workspace from Kelsey at Poofy Cheeks
- Creative Storage Solutions for your Craft Studio by Beth of Creatively Beth
- Organize your Greeting Cards with a complete tutorial from Liz of Liz on Call
- Create a DIY Desktop Organizer with Upcycled Items from Kimberly of Crafting Cheerfully
- Get your Kitchen Organized in 2022 with a set of Labels from Ginger at Ginger Snap Crafts
- Crochet a Wall Basket for trendy storage with a free pattern from Heather of Homemade
- Organizing your Spices just got easier with a collection of Labels from Teresa at Simply Made Fun
- Make a Fun Desk Organizer with step-by-step directions from Elise of Polka Dot Blue Jay
- Give Jars an Easy Upcycle into Colorful Craft Storage by Laura of Me and My INKlings


Heather
Saturday 8th of January 2022
I love your Peg Board idea! The joy of organizing! I also am partial to the first Harry Potter book, Harry Potter and the Sorcerer's Stone. What a great giveaway!