
My sister got married last weekend. The wedding was stunning – from her dress and hair to the barn and decor. Months ago she had asked me to make DIY Wedding Centerpieces using wood and hoops.
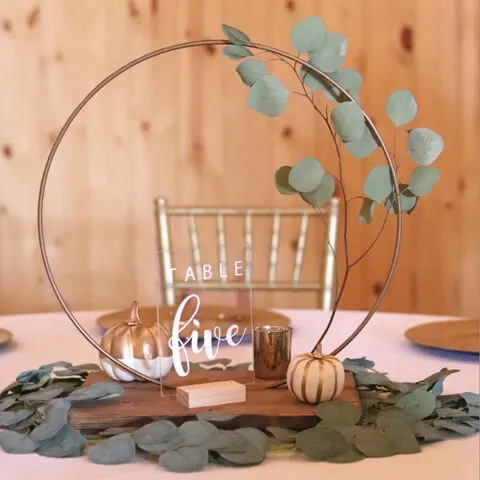
Of course I waited until the last minute and was finishing them up days before the wedding. I got them to her in time to decorate with florals and then she added the table numbers (she made), pumpkins and more greenery around them for some absolutely stunning centerpieces.

Purchasing centerpieces like this would cost a small fortune (especially with all the extras!), but the wood platform and hoop became quite affordable as a DIY.
Pictures of the Hoop Centerpiece Process


Wedding Centerpiece DIY - Hoop
Wood & Metal Hoop Wedding Centerpieces
Materials
- Hoops
- (2) 1″x6″x8′ pine board (cut into 14 inch pieces)
- (1) 1″x3″x8′ pine board (cut into 5 inch pieces)
- Wood stain (my favorite is Minwax Provincial)
- 1 1/4″ Wood Screws
- Cloth for staining
- Sand paper
Tools
- Drill
- Orbital Sander
- Miter Saw (If cutting yourself)
- Pencil
- Measuring Tape
Instructions
- Cutting the Wood: I have a miter saw that I cut the wood with, but the nice guys at Home Depot or Lowe's will usually cut the wood for you if you don’t have a saw. Make sure to measure after each cut with a measuring tape and pencil. As a power tool beginner I thought I could mark all my cuts first, but I forgot about accounting for the width of the blade.
- Stain each side of the 1x6 peices you cut.
- I butted two of the 1×6 pieces against one another on the long side and then squeezed the hoop in between. I slowly removed the hoop without moving the wood.
- Place the 1x3s over the 1x6s as shown above. You want them to be fairly close to the outside edges so the hoop cradles in between.
- Drill two screws into each side of the 1×3 for a total of four. Flip it over and place the hoop in between the gap of the 1x6s.


When my sister originally got the hoops they were from Joann Fabrics, but they were a seasonal item and they don’t have them anymore. If you wanted a different color, you could always buy the more readily available silver hoops and spray paint them.
Love the Wedding Centerpiece? Hover Image Below and Pin!


I stained with Minwax in the color Provincial. You know those old shirts your kids outgrow but have too many stains to donate? I use those for stain rags.


Remember the hoop stand for the glasses from her Bridal Shower? Same thing!
Want to see a few more pictures from her big day!? Of course you do!


My daughter Delilah and I getting ready in our robes.


Delilah’s Flower Girl hair and floral crown.


Flower Girl Tutus for my neice and daughter. We made these with tulle and a wide elastic band. My sister personalized the hangers. I loved the personal touch.


And I couldn’t end this without sharing a picture of the newly married bride and groom!